Monday, 3 September 2012
Black Spruce Carving Mallet
One of the projects my students will be working on this year is making a carving mallet. We didn't need these last year when we made wooden spoons, but there will be some projects this year where a mallet to use with the gouges will come in handy.
This weekend I made a prototype from some black spruce harvested from the burn zone of the Miller's Reach fire. That was a huge fire back in 1996 that burned over 37,000 acres and around 400 buildings. The area, like a lot of this part of Alaska, is boggy, and the black spruce are dominant. I don't know if black spruce grows differently elsewhere, but up here they are very "Doctor Seuss" like:

They are extremely slow growing - this is a mature stand that escaped the fire. In the burnt areas they look like bare, black poles.
Here's the section I started with:

It was an off-cut from another project at our school and had been stripped with a power planer. "Oh the humanity!"
Here's what I meant by slow growing:

This one has 60 rings per inch! So at three inches in diameter, it's a 90 year old tree - yikes!
After cutting to length, I worked at the shavehorse to rough out the shape of the handle with a drawknife. Then I switched to the spokeshaves to smooth and refine. I should mention how handy the step cut in the end of the shavehorse was on this project. For creating the curve down from the head, I used the horse normally. For the flair at the bottom of the handle, I couldn't keep shaving in the same direction as it would be working against the grain. I could have reversed the spokeshave and pushed, but instead I removed the mallet from under the horse's head, put the top of the mallet head on my solar plexus and wedged the end of the handle on the step and shave down the curve with the grain - easy and quick!
Here it is with the handle mostly finished:

And here it is after the head was also cleaned up:

And oiled:


I'm not sure if the checking will be a problem or not. Even with the cracks, it feels solid. Time will tell...
And the final mallet with the tools used to make it:

The kit: drawknife, flat and round spokeshaves, and a curved scraper. Missing are the shavehorse, and the saw.

Sunday, 26 August 2012
Cool Old Tool Chest
Okay, it's pretty obvious I haven't done much with the blog lately, which sadly means I haven't done much in the shop lately either. It was a summer of travel and training, and while both were excellent, it was way, way too much. Now I'm back, but school has started up again and I'm buried.
But, I've finally had a chance to dig through the pictures I took this summer and before I go in and work on my classroom, I'm going to do a post.
As I said, I had training this summer, and it was in California. Not being one to drive by a store or flea market that "just might have old tools", I did squeeze in a little tool hunting. I didn't find much, but here's something of note.

According to the tag, this tool chest belonged to someone who worked for the Murphy Bed Co. I thought the unfolding design was pretty cool.
Here's another shot:

It was probably a good thing that I had to fly home, or it might have followed me, and I really don't need another tool chest, even one this cool. Which reminds me, I did buy a new chest last spring and I never posted on that one. Soon, maybe...
Tuesday, 10 July 2012
Why a Duck?
This post is more than six months late! Sigh...
It's my daughter Clara's first birthday present. Her big brother got a skunk bench, and now she gets a duck bench. The skunk bench was a reproduction of a family heirloom. Some families have things like highboys as heirlooms - my family has a skunk bench. Hmm.
Anyway, the duck bench is a new design, but I wanted it to have the same whimsical feeling as the skunk. I think I got it right. Before giving it to my daughter, I showed it to my son and asked him what he thought. His face lit up and he whispered "It's perfect!".

I think Clara likes it too.
Saturday, 30 June 2012
Tour of the School Shop
If you've been reading this blog for a while, you probably know that I've been teaching woodworking (hand tools only) at the Waldorf Inspired charter school where I also teach middle school. It's been a fantastic adventure, and since I started with a blank slate, it has also been a lot of work.
Our school opened two years ago, and I had an empty room to convert into a shop. In typical overly optimistic no-time-reality fashion, I thought it would take until Christmas break to turn my vision into reality. Ha! Well, the students and I got busy and two years later it's finally finished, mostly, and ready to be shown.
So here is the tour.
These first four shots pan the room right to left from the wood storage corner. In the first picture you can see the door into the classroom from the hallway, the sharpening station, clamp rack, our original bench and the chalkboard.

In the second shot, you can see the tool storage corner - shelves, saw board, brace and hand drill board. And of course, the GGTCOD.

The third shot gives a better idea of the main working area with the workbenches. There are three different variations on the basic split top design. They evolved over time based on experience and changing space needs as we moved to a slightly smaller, but more suitable room in year two. The first design, as already stated, is the bench at the front by the chalkboard. The two benches visible on the right in this shot are variation two. They are shorter and the vises are moved outside of the legs which is more useful for most tasks.

In this final shot from this corner, you can see the last two benches, which are variation three. They have the longer tops of the first variety, but the short bases of variation two, which gives them oddly long overhangs. What happened was, I had planned on four more of the shorter benches, but it became evident that it would just be too tight - but not before we had already built the shorter bases. So, in order to have enough work stations for all the students, we went back to longer tops and just made do with the existing bases. Some day we will change out the stretchers and make the benches less awkward.

And now three shots from a front corner of the shop - mostly the same stuff, just different perspectives. Here's the front of the room again:
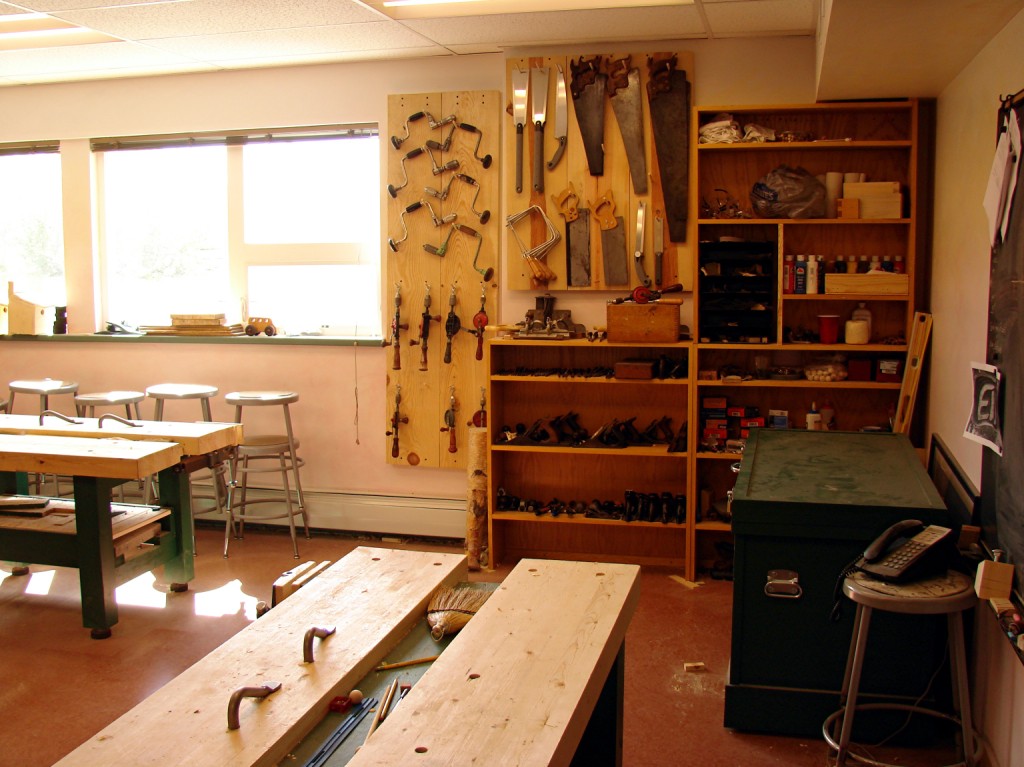
And across the benches to the old Stanley Tool Guide on the wall:

Here you get a first look at wood storage, scrap bins, project storage shelves, and the saw bench. This is a slightly modified version of my saw bench from my own shop. It's a little lower, to better suit the students, and made from 2x8s rather than 2x6 stock to be more stable. You can also see the door to the outside, which is one of the features of the new room that really make it work well. The other is the concrete slab floor - no more bouncing!

A shot from along the bank of southwest facing windows, which give great raking light to compensate for the overhead florescenct lights.

Another shot of the benches, version two on the left, and three on the right. The bench on the right doesn't have its end cover on the stretcher shelf yet, which allows you to see how it was designed. The stretchers are "L" shaped with vertical 2x6s and horizontal 2x4s glued and screwed together. The spacing between stretchers is such that cement pavers fit nicely across to give some extra weight. The inside edges of the 2x6s are rabbeted to accept 2x4 slats which hide the pavers and create the shelf. The trestle ends of the base are 2x4 laminated legs with 2x4 stretchers - the bottom M&T and the top bridal joints. The leveler feet are the Mark II design I posted about here - simple and effective.

Another look at version two:

And version three:

Here's a better shot of the cool old dovetailed chest from Germany that I picked up to hid stuff in that I don't feel like looking at on a daily basis. It's been lurking in the background in several pictures and I thought it deserved it's own photo. Well, really I should give it a full post, but that will have to wait...

And finally, a closer look at the most troublesome part of the shop. It's not looking so bad now, but I had just spent about 30 minutes cleaning it up. The big can is for plane shavings, well at least the ones that make it in there. The students usually take the really cool ones with them.

Well, I guess that's it. It sure makes me happy - I hope you enjoyed seeing it!
Wednesday, 13 June 2012
Instant Bench Top Extension
Dan's Shop Rule #7: No matter how large your workbench is, it will always need to be just a little larger.
So the other day I'm working on the Rolltop desk; it was sitting up on the bench, and I needed to take the top off and work on that as well - ah, rule #7. What to do? The desk was heavy, awkward and, especially at that stage of repair, weak. I really couldn't take it down.
As I was turning this problem over in my mind, I started to focus on the plywood bench cover I was using under the desk to protect from glue drips etc. Then I remembered Rule #9.
Dan's Shop Rule #9: All tools have at least three uses.
Well, I'd originally built the plywood and 2x4 cover for protecting the bench from the mess of cleaning rusty tools - sort of a more permanent version of cardboard. It slips over the bench top and into the vise. Hmm. What would happen if I slid it partially off the end and tightened the vise? Whoa! Cool! Instant larger bench! Take that Rule #7!
The pictures below illustrate this simple, yet slow to be discovered, second use:


There is of course a limit to how much weight can be placed on the extension before it starts to sag. With the desk on top, I added a clamp opposite the vise to help hold everything tight.
So, now I've started to wonder about the third use of the plywood cover...
Monday, 11 June 2012
Rolltop Desk Rescue and Thoughts on Shop Satisfaction
I think it is interesting how shop projects give me satisfaction in various ways. In my experience, there are at least three distinct kinds of woodworking satisfaction. With most projects, it's the creative aspect that I enjoy. With others it's the challenge, or problem solving. And sometimes it's just the tools. This last project was definitely in the third category.
I'd been looking for a new desk for my classroom. I wanted something on the smaller side, with character, and definitely wood. After a lot of time online I found exactly what I was looking for - sort of.
It was a smallish roll-top desk and I really liked the way it looked in the pictures. In person though, it had problems - and a lot of them. It looked like it had fallen off a truck or down some stairs or maybe off a truck and down some stairs. Almost all the leg and panel joints were busted - or I should say had been busted. Someone had done some questionable repairs with a ton of glue and nails. Huh.
Clearly this was going to be a project and not just a purchase. I thought about just walking away, but it was the only desk I had found so far that I liked and it came with an awesome old wooden swivel chair. I ended up getting a much better price and it came home with me.
Now as projects go, this one was a little bit of a challenge. I had to figure out how to completely disassemble the desk without completely destroying the "repaired" parts or doing new harm to the few undamaged joints. It was also not without some creative elements. I had to create a new system of glue blocks to support the more damaged parts. However, it was the tools used that gave me the real satisfaction.
First, as I was getting ready to add the glue blocks, I needed to scrape off the old finish and much glue from earlier repairs. It just so happened that I had a cool old scraper holder sitting on the shelf. It worked great, and felt just perfect in my hand. I love putting old tools back to work; they just seem so happy.

Second, as I was adjusting the angle on the glue blocks the oak was really putting up a fight. Both my "go-to" jack and block plane were not quite doing it. I could have sharpened them and they would have done fine, but instead I decided to give the old bevel up jack a try. Shazam!


Talk about "the right tool for the job." Awesome and such a pleasure! Now I know a lot of folks are going minimalist, and there is a certain satisfaction in that (which I've touched on before). I guess I'd put that in my "challenge" category. But there is a special kind of joy in using a tool for the exact purpose it was created. For the purpose at which it excels. No "jack of all trades" but a true specialist. Could I have done this job without this tool - without a doubt. Would I have missed a deep and powerful satisfaction - yes! I'm glad I have that tool, and glad I used it.
Oh, and the desk itself? Here are a few shots of the final outcome:


Sunday, 20 May 2012
Cool Old Scraper Holder
Well, the usual has happened - too much work, not enough play...
I did pick up this cool old scraper holder on eBay. I don't remember seeing one like it before. I'm pretty sure it was shop made, but I could be wrong. Someone put a lot of time into shaping the handle - it is almost entirely curved and feels great in the hand.


For whatever reason, the bottom jaw doesn't quite close tight enough, but that was easy to fix with some shavings:


The only mark I could find is on the end of the handle - "LVM".

Another old tool with its own mysterious past. Whose hands once held it as mine do?
Subscribe to:
Posts (Atom)
